Big Game Processing Part 2: Breaking Down a Hindquarter

One of the most rewarding parts of any big game hunt is seeing those neat packages of meat, carefully stacked in the freezer. Even better, is sinking your knife and fork into a perfectly cooked piece of wild game on your plate.
If you’ve never done it, processing a big game animal at home may seem intimidating. When you get home from a hunt and open up a cooler to see a load of meat (which admittedly at this stage doesn’t look very appetizing) it’s easy to feel overwhelmed. Don’t let that stop you. Once you get started, breaking down any big game animal is much easier than you might first assume. It’s fun and it’s rewarding to have control over the final results.
This is the second part in a series on big game processing. In the first part, we covered necessary equipment, supplies and how to get started. In this installment, we’ll get into the nitty gritty of how to break down a big game hindquarter – and a few options of what you can do with it.

Bull Elk Hindquarter
Getting the Animal Home
Before we dive into the butchering process, it may be helpful to address a little background information. The following tips are based on the assumption that we’re bringing home a quartered big game animal. On nearly all of our hunts, we use the gutless method to quarter animals in the field. Extracting a whole carcass is rarely possible on western hunts (perhaps with the exception of antelope).
From a meat-care standpoint, the gutless method offers a few distinct advantages. Most importantly, it reduces the amount of blood and other fluids that come into contact with the meat. Meat that gets soaked in blood is at a higher risk of spoilage than meat that stays dry. For that reason, meat around the pelvis and other places where blood pools are the ones to watch out for. If that area around the rump gets very bloody, you can rinse it off with cold water and then pat it dry.

Quartered Cow Elk
Whenever possible, we like to take bone-in quarters from the field. The only boneless meat would be the backstraps (loins), tenderloins and neck – plus any miscellaneous trim like brisket or rib meat. Bone-in quarters are easier to cool. Plus, taking meat off the bone before rigor-mortis has passed will lead to muscle contraction called “shortening” that can lead to tough meat.
Of course some backcountry situations require boning out the meat. If you’re working with boneless meat at home, the tips here certainly still apply. In the field, just make sure you take extra steps to cool the meat and keep it from forming a big, dense ball at the bottom of a game bag. One of the ways you can do that is to use game bags designed for boned-out meat, like our Carnivore Set.
For more tips on meat care in the field and how to get it home in the best possible condition, you might take a look at some of these previous articles:
Tips for Warm Weather Meat Care
Tips for Using Caribou Gear Game Bags
Why and How to Use Citric Acid Spray
Meat Care Tips to Maximize Your Yield
Start With Outcomes In Mind
Before you begin making any cuts, decide which final products you’d like to have. This will make it easy to decide which cuts you’ll leave whole, cut into steaks or cube for the grinder.
Whatever you decide, there’s no right or wrong answer. For example, if your family eats a lot of burger, make that a priority. Maybe save one or two prime cuts. But grind everything else. On the other hand, if you like the idea of cooking with whole-muscle roasts, bone-in roasts or any specific cuts, make sure you decide that ahead of time. It’s much easier and faster to get started when you know where you’d like to end up.
Keep Surfaces Clean
As you process an animal, keep your working surface and your tools clean. This will help ensure you get the best-tasting end products. For example, I’ll never take a quarter that still has stray hairs or dirt and place it on my clean cutting board. What’s more, I often clean my cutting board and utensils between each quarter, depending on the size of the animal.
For a few more tips on how to clean the meat before you begin and what you’ll need to get started, see the previous article in this series.
BREAKING DOWN A HINDQUARTER
Let’s start with your biggest, baddest piece of meat. A hindquarter, especially from a large animal like an elk, might look difficult at first. But it’s actually rather easy once you remove the femur and begin separating the muscles. Most of the primary cuts on the hindquarter are loosely connected and separate easily.
Remove the Bone
Start by laying the clean hindquarter on your cutting surface with the ball from the femur joint facing up. Insert your knife at the ball and make a cut down along the entire length of the femur bone. If you plan to save the whole muscle roasts and don’t want to cut into them, you can follow the seams between the muscles all the way down the femur.

Deboning an Elk Hindquarter
At this point, you can begin running your knife along both sides and around the femur, separating it from the muscles and eventually lifting it out of place, leaving you with a boneless ham. The shin bone or “drumstick” looking piece below the femur is the shank. We’ll get into that later. For now, you can set aside the shank and the femur.

Removing the Femur From an Elk Hindquarter
On a small animal like an antelope or whitetail doe, you could stop here, truss the whole ham together and do a whole, smoked venison ham. I’ve saved whole antelope hindquarters for this purpose. After a few days in a wet brine and several hours on the smoker, it’s fantastic. Otherwise, we’ll continue breaking it down…

Whole Smoked Antelope Ham
Separate The Muscles
Next, take your boneless hindquarter and begin to open it up like a book where the femur was removed. If you plan to make burger or sausage, you don’t need to be very careful. It’s all getting cut up anyway. If you plan to save whole roasts or steaks, cut carefully along the web-like connective tissue that holds each piece together. On the outsides, there may be a layer of fat obscuring these seams. Trim away the fat and be patient. As you work your way along, you’ll find that each cut separates rather easily.
Antelope Hindquarter with Femur Removed
Identifying the Muscles and How to Use Them
You’ll end up with several primary cuts on each hindquarter that are big and easy to identify. Plus, you’ll have a few smaller cuts, and odds and ends that will probably end up as burger or sausage.
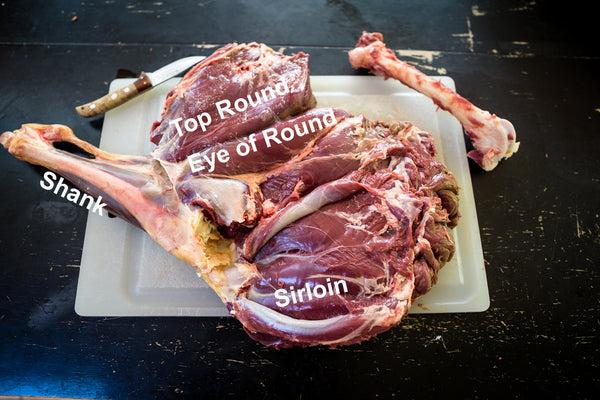
The primary cuts are the sirloin, top round, bottom round and eye of round. Again, there’s no right or wrong way to save and package it. Whether it’s burger, stew meat, steaks or whole roasts, do whatever works for you or your family. But for whatever it’s worth, here’s my approach to each of these cuts…

Separating an Elk Hindquarter
The Sirloin
The sirloin (or sirloin tip) is also known as the “football roast” because of its distinct football shape. The sirloin has veins of connective tissue running throughout. This makes it a perfect candidate for the crock-pot or grinding into burger. All that connective tissue would make a tough steak. So we don’t recommend throwing this one on the grill. But on the other hand, if you braise it for several hours, all that tissue breaks down and makes it a great slow-cooker dish.

Elk Sirloin
I like to use my sirloins for things like Mexican-style barbacoa, pulled BBQ sandwiches or pot roast. The sirloin from a small animal like an antelope can usually be saved whole. On an elk, I usually break it down into 2-3lb. roasts for family-sized portions.

Cross-section of an elk sirloin. This cut is excellent for pot roast or braising.
Top and Bottom Rounds
The rounds – and especially the bottom round – are my favorite pieces of meat on the hind leg of a big game animal. For this reason, I usually save them whole. The top round is sometimes called the "inside round" because it is found on the inside of the leg. The bottom round is sometimes called the "outside round" because it is found on the outside of the leg. Once you separate them and clean them up, they are beautiful pieces of meat.

Elk Bottom Round
They have a distinct, long-grain texture, similar to that of a beef flank steak. In fact, one of my favorite ways to prepare a round roast is to butterfly it open, marinade it and then lay it on the grill just like carne asada or flank steak. The round roasts are pure muscles with no connective tissue. So they’re excellent when grilled to medium rare and then sliced across the grain. Of course depending on your preferences, the round roasts can also be slow cooked, used for stew meat or ground for burger and sausage.

Elk Top Round
Eye of Round
The eye of round is a relatively small cylindrical roast tucked between the top round and bottom round. This is an excellent piece of meat that’s worth saving whole. It’s pure muscle with no interior connective tissue. Sometimes called the poor man’s tenderloin, it can be prepared as such – a little salt and pepper and a sear on a hot grill to medium rare is all it needs. Another favorite way to prepare eye of round is to butterfly it open, fill the center with sautéed mushrooms or any number of fillings, truss it back together, and then roast or grill to medium rare. Slice it against the grain and it will have the look of a beautiful stuffed tenderloin.

Elk Eye of Round
Other Pieces of the Hindquarter
There are a couple more small roasts on the hindquarter like the “tri-tip” and the rump. The rump is sometimes called "top sirloin" (not to be confused with the much larger, previously mentioned sirloin tip). These small roasts can be saved whole, or set aside for stew meat or ground meat. Since these are small and have some connective tissue, I usually add them to my grind.
The Shanks
The shank is the meat and bone below the knee on both the front and hindquarters. Many hunters simply debone the shank, cut it up and add it to their sausage or ground meat. If you’re a fan of burger and sausage, this is a good option. However, I like to save my shanks whole as they are excellent for braising. When cooked low and slow for hours, all that collagen and connective tissue slowly melts away, giving the meat excellent flavor and texture. Braised shanks can be made in a variety of styles, from Mexican to Mediterranean, to Asian. If you’ve never cooked a bone-in shank, give it a try!

Antelope Hind Shank Separated from Femur
Notes on Trimming
When cleaning up roasts or steaks from the hindquarter, trim off the ends to make them even thickness. This will make cooking them much easier. Anything that gets cut off will be destined for the grinder. If your meat has been hanging for a day or more, you’ll notice a skin or rind will have formed on the outside of the quarter. While this skin appears somewhat dry – is actually very usable. Simply trim it off and add it to your ground meat. Even if your meat has been aging for a week or more, this outer rind is a great addition to your burger, adding a rich, dry-aged flavor.

Removing the outside "rind" from a hindquarter that has been hanging. This will be added to the ground meat.
Silverskin is the white tissue that surrounds many of the muscles. On pieces that you intend to cook medium-rare like the bottom round or eye of round, siverskin should be trimmed off the outside of the meat before cooking. Otherwise, it contracts and becomes very tough when it hits the grill. If I plan to package and freeze the meat anyway, I leave the silverskin on. It adds an extra layer of protection in the freezer. When I thaw the meat for cooking, I’ll trim the silverskin then. The only time I trim silverskin before freezing, is when I plan to give the meat to someone else. In that case, I want it to look presentable and be ready for the kitchen.

Trimming Silverskin
If you intend to braise or slow-cook a piece of meat, there’s no need to remove all of the silverskin. In fact, you’ll make yourself crazy trying to remove all the layers from something like a sirloin or shank. Just remove any large pieces of silverskin or fat from the outside and call it good. The rest will break down in the slow cooker.
Speaking of fat – with very few exceptions, venison fat is not pleasant to eat. It’s very waxy and eventually it can go bad even in the freezer. So always clean away as much fat as possible when preparing steaks and roasts for the freezer.
When preparing meat for the grinder, I’ll do my best to remove the biggest and toughest pieces of silverskin. But again, you’ll make yourself crazy if you try and remove it all. As long as you have a quality grinder, it’ll handle it just fine. Just make sure your meat is partially frozen (firm but not solid) before you send it through the grinder. This will give your meat a much better texture – fully thawed meat becomes mushy in the grinder. Plus, your grinder will have a much easier time with connective tissues when partially frozen.
CONTACT US WITH QUESTIONS
If you have questions about meat care in the field or at home, please let us know. Have your own processing tips? Please leave them in the comments below! We know there are a lot of ways to skin this cat and we love learning new tricks.
Keep an eye out for our upcoming articles in this series as we tackle the front shoulders, neck and other great parts of a big game animal. In the meantime, we hope you are able to enjoy great wild game meals with family and friends!

Processed Elk Hindquarter
By Ryan McSparran
Ryan is an outdoor writer based in Colorado, and is proud to be a part of the team at Caribou Gear.
Ready to Gear Up?
Shop field-proven hunting gear from Caribou Gear or explore more articles from our Journal.
More from the Caribou Gear Journal


